- Published on
RESTful & Build in Node.js
- Authors

- Name
- Jack Fan
RESTful
Introducing Express
Express 是轻量级、快速、且拥有良好文档系统的 Node 框架,访问 www.npmjs.com 搜索 express 获取更多信息。
安装 express
npm i express
Building Your First Web Server
新建一个index.js 或 app.js。加载 express 模块,它返回一个函数,将函数储存为 express 变量。这个函数则返回一个类型为 Express 的对象,储存为变量 app。
const express = require('express') // Return a function
const app = express() // Return an object with type of Express
首先看 app.get(),接收两个参数
- URL
- 回调函数,当对给定端口使用
get方法时候调用
访问文档以获取更多 request、response 的属性
app.get('/', (req, res) => {
  res.send('Hello World')
})
// Visit document to get more properties of req and res.
app.listen(3000, () => console.log('Listening on the port 3000...'))
现在在控制台运行 node index.js,访问 localhost:3000,就能看到 Hello World.
再写一个。
app.get('/api/courses', (req, res) => {
  res.send([1, 2, 3])
})
再次运行 node index.js,访问 localhost:3000/api/courses,就能看到对应的数组.
// index.js
const express = require('express') // Return a function
const app = express() // Return an object with type of Express

app.get('/', (req, res) => {
  res.send('Hello World')
})

app.get('/api/courses', (req, res) => {
  res.send([1, 2, 3])
})
// Visit document to get more properties of req and res.
app.listen(3000, () => console.log('Listening on the port 3000...'))

// We don't have if blocks here.
// We can move some of these rounds to a different file.
// For example, we can move all the rounds related to courses to a new file: courses.js
Nodemon
我们现在每次做出改动,都需要重新运行一次 node 命令。使用 Nodemon 来进行监控,每次文件发生改变都会自动重新编译。
npn i -g nodemon
现在使用nodemon index.js来代替node index.js
Environment Variables
看到我们的代码
app.listen(3000, () => console.log('Listening on the port 3000...'))
端口 3000 是写死的,这在开发环境还可以用,但到了生产环境就不凑效了,因为端口是由平台动态分配的,所以我们要使用环境变量。
基本上 Node 环境的共享平台,环境变量中管理端口的属性是 PORT。
环境变量就是在进程运行时侯才产生的变量,是在应用之外设置的变量。
使用 process 来访问,如果设置了环境变量,就使用,否则为 3000。
const port = process.env.PORT || 3000
app.listen(3000, () => console.log(`Listening on the port ${port}...`))
现在使用 nodemon,会发现监听的是 3000 端口。现在来设置环境变量。
在 Mac 使用 export,Windows 为 set, 在 Terminal 输入 set PORT=5000。此时就会发现监听的是 5000 端口了。
Route Parameters
之前我们实现了获取所有课程的 API,现在来做获取单一课程的 API。
如果要在获取单一课程,我们应该在 URL 中包含课程信息,如**/api/courses/1**。
app.get('/api/courses/:id', (req, res) => {
  res.send(req.params.id)
})
现在我们访问 localhost:3000/api/courses/1,就会发现其返回了一个 1。如果不止一个参数呢?
app.get('/api/posts/:year/:month', (req, res) => {
  res.send(req.params) //------/api/posts/2018/2 ----> {"year":"2018","month":"2"}
})
此时访问,就会返回一个对象,里面包含了 year 和 month 属性,其 value 则为 URL 内的值。
使用这种表达式,也可以读取查询字符串 (Query String Parameters) ,也就是跟在问号后的参数
// We use parameters for essiential or required value,
// and query string parameters for anything that is optional

app.get('/api/posts/:year', (req, res) => {
  res.send(req.query) //------Visit /api/posts/2018?sortBy=name (Notice the '?' before 'sortBy') --->  {"sortBy":"name"}
})
Handling GET Requests
现在来完成获取单一课程的 API。
const courses = [
  { id: 1, name: 'courses1' },
  { id: 2, name: 'courses2' },
  { id: 3, name: 'courses3' },
]

app.get('/api/courses/:id', (req, res) => {
  const course = courses.find((c) => c.id === parseInt(req.params.id))
  if (!course) res.status(404).send('The course with the given ID was not found.')
  res.send(course)
})
有课程则返回对应的课程对象,如果没有,则返回 404 和提示信息。
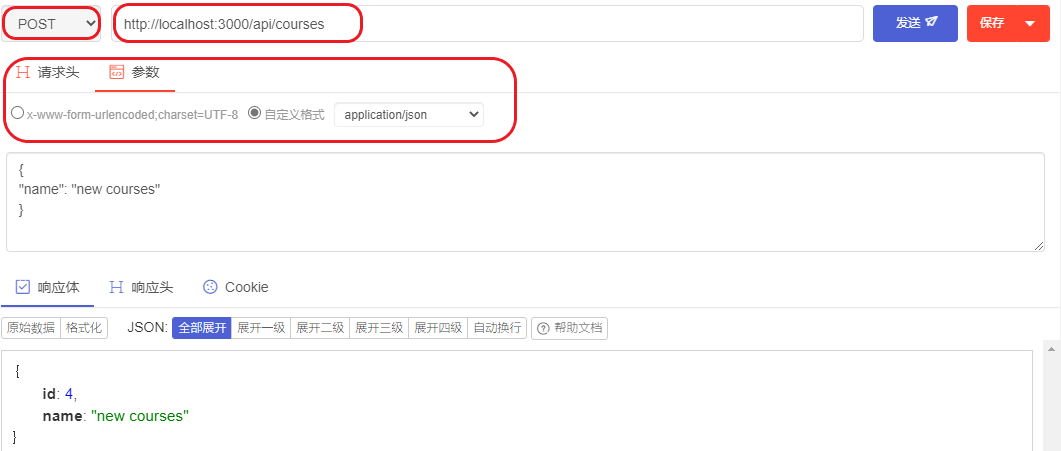
Handling POST Requests
我们现在来创建一个 POST 请求,来新建一个课程。
在 POST 请求中,我们需要读取 request 的请求体 (Body) 以获得课程对象,使用新的属性来创建新的课程。
当我们在处理 request.body.name 的时候,我们要打开 Express 获取请求体(Body)种 JSON 对象的功能,这默认是关闭的。
const express = require('express')
const app = express()

app.use(express.json()) // Enable parsing of JSON object
在这里我们其实是添加了一个中间件。当我们使用 express.json() 这个方法的时候,它返回一个中间件,然后使用 use 方法在处理请求的流程中使用这个中间件。
app.post('/api/courses', (req, res) => {
  const course = {
    id: courses.length + 1,
    name: req.body.name, // Assume there is an object in req.body, and the object has a property 'name',
    // In order for this line to work, we need to enable parsing of JSON object in the body of request (Whiich is disable by default).
  }
  courses.push(course)
  res.send(course)
})
Calling Endpoints Using Postman
我们可以使用 postman、APIpost 来进行测试。其实对于 Chrome 可以安装 Postman 插件,Edge 有 Postwoman 插件。
Input Validation
如果客户端在 POST 的时候忘记发送了某个属性,例如上一个添加课程的请求中没有发送 name 属性,或者 name
属性不合规,怎么办?所以我们需要验证。
**从安全角度看永远不要相信客户端发来的东西,永远都要验证。**在这里我们只有一个 name 属性,所以可以做一个很简单的小验证。
app.post('/api/courses', (req, res) => {
  if (!req.body.name || req.body.name.length < 3) {
    res.status(400).send('Name is required and should be minimum 3 characters')
    retuen
  }

  const course = {
    id: courses.length + 1,
    name: req.body.name,
  }
  courses.push(course)
  res.send(course)
})
但如果有很多属性,我们不可能都这样写,所以我们使用 Joi。 (npm i joi) 我们用 joi 重写一次这个逻辑
首先导入
const Joi = require('joi')
使用 Joi 之前,需要定义一个 schema,它定义了对象的外观特征,比如应该有什么属性,是不是 email,是不是字符串,最大最小为多少。
// Using Joi to validate input
const schema = Joi.object({
  name: Joi.string().min(3).required(),
})
const result = schema.validate(req.body)
if (result.error) {
  res.status(400).send(result.error)
}
Joi 有一个用于验证密码安全的库,joi-password-complexity,限定大小写,符号等
Handling PUT Request
我们为课程 API 创建一个 PUT 请求,首先,我们先查找是否有这个课程,如果不存在返回 404。若存在,验证客户端发送的东西,不符合则发送 400。如果都可以,则更新课程。
app.put('/api/courses/:id', (req, res) => {
  // Look up the course
  // If not existing, return 404
  const course = courses.find((c) => c.id === parseInt(req.params.id))
  if (!course) return res.status(404).send('The course with the given ID was not found.')

  // Validate
  // If invalid, return 400 - Bad Request
  const schema = Joi.object({
    name: Joi.string().min(3).required(),
  })
  const result = schema.validate(req.body)
  if (result.error) {
    return res.status(400).send(result.error)
  }

  // Upadate course
  course.name = req.body.name
  // Return the updated course
  res.send(course)
})
可以看到,我们复制了验证数据的逻辑,所以我们将他单独分离出来,这样就可由不只是在 PUT 语句里使用。
function validateCourse(course) {
  const schema = Joi.object({
    name: Joi.string().min(3).required(),
  })
  return schema.validate(course)
}
// Validate
// If invalid, return 400 - Bad Request

const { error } = validateCourse(req.body); // get the req.body.error
if (error) return res.status(400).send(error);
我们也要记得,将刚才写的 POST 请求的语句的验证部分也用上我们提取出来的验证函数。
Handling DELETE Request
与 PUT 处理逻辑相同,先查找课程,符合要求则删除课程。
app.delete('/api/courses/:id', (req, res) => {
  // Look up the course
  // Nt existing, return 404
  const course = courses.find((c) => c.id === parseInt(req.params.id))
  if (!course) return res.status(404).send('The course with the given ID was not found.')

  // Delete
  const index = courses.indexOf(course)
  courses.splice(index, 1)

  // Return the same course
  res.send(course)
})
All Codes.
// index.js
const Joi = require('joi')
const express = require('express')
const app = express()

app.use(express.json()) // Enable parsing of JSON object

const courses = [
  { id: 1, name: 'courses1' },
  { id: 2, name: 'courses2' },
  { id: 3, name: 'courses3' },
]

app.get('/api/courses', (req, res) => {
  res.send(courses)
})

app.post('/api/courses', (req, res) => {
  const { error } = validateCourse(req.body) // get the req.body.error
  if (error) return res.status(400).send(error)
  const course = {
    id: courses.length + 1,
    name: req.body.name,
  }
  courses.push(course)
  res.send(course)
})

app.delete('/api/courses/:id', (req, res) => {
  // Look up the course
  // Nt existing, return 404
  const course = courses.find((c) => c.id === parseInt(req.params.id))
  if (!course) return res.status(404).send('The course with the given ID was not found.')

  // Delete
  const index = courses.indexOf(course)
  courses.splice(index, 1)

  // Return the same course
  res.send(course)
})

function validateCourse(course) {
  const schema = Joi.object({
    name: Joi.string().min(3).required(),
  })
  return schema.validate(course)
}

const port = process.env.PORT || 3000

app.listen(3000, () => console.log(`Listening on the port ${port}...`))
Node.js: The Complete Guide to Build RESTful APIs (2018) | Udemy